


.JPG)
The great thing about this technique is that you can do it with household items. Also it is free of strong, toxic chemicals! Much safer for you and the environment as well. All you will need is you piece of sterling silver, some eggs, a glass jar with a top, a wire 'tie' like the ones at the grocery store, something to boil the eggs, silver polish cloth.

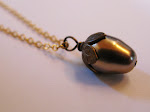
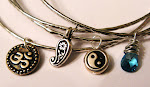
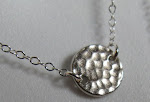
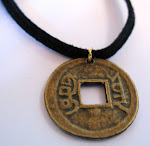
This is the pendant I wanted to oxidize. Its a solid, thick, double sided pendant. So it was a little tricky to get both sides darkened. I actually had to repeat the process a few times to achieve the darkness i wanted. It is engraved with the word HOPE over and over in a lovely script font~ such a powerful word that i wanted it to stand out from the background.
1.) Wash the pendant (or chain, or whatever you are darkening) with a dish liquid. I used Dawn. Be sure to not touch the surface by hand after that as any oils will affect the darkening effect. Dry off with a napkin or cloth (that has not been dried with dryer sheets) Any additional chemical contamination will also affect the darkening.

2.) Hard Boil one or 2 eggs about 10 minutes on high heat.
3.) While the eggs boil, attach the piece to be darkened from the metal tie and figure out how to position it so that it is suspended from the jar. What i did was put the tie through the pendant and then left the tie straight (no bending) then I laid it across the top of the mason jar opening. This way, when you put the top of the lid on, the ends of the wire tie stick out of the edges, but are secure because the cap is on top of it.
4.)Place the eggs (with shell on) in the mason jar and crush them up. Quickly position the tie with the piece you are darkening and cap on the lid. This needs to be done as fast as possible because once the eggs are crushed, it is the sulfur from the eggs that darken the metal. So the more that connects with the silver, the better the color will be.
HINT: Its important to suspend the piece because it will get the most even coating or oxidation since the sulfur from the eggs will travel up. You could also use tupperware or a plastic bag, but i found this method most effective.
5.)After about 20 minutes or up to 24 hours, depending your time constraints, you can take out the piece of silver you are darkening. I waited about one hour. If you want the item darker, repeat the process. This was my first time oxidizing sterling silver and it took 3 repeats for me to acheive the level of darkness i wanted. Please note that the entire piece of silver will be dark, but we are not finished yet!

6.) The last step is really going to make all the difference! After gently rinsing off the silver, take a silver polishing cloth (the kind you can find at walmart: thin sheets like kleenxes) cut the cloth down and gently rub the metal until you get the desired finish. On chains, the result will be dark and shiny. However, if there is depth to the silver, like this one; which has two levels, one surface and then the engraved script, you can get a two toned look. I was going for the two tones with the script being dark and popping out against the bright sterling silver background.
 and VOILA!! oxidized pendant!
 This procedure also has a great effect on silver with a brushed or textured surface, or with any indentation lines for detail as it will make it pop! The appeal is rugged and natural and has become very popular in today's jewelry trends. You can also use it on other sterling silver objects too, to change up the look.
If you decide you don't like the darkened finish, it IS reversible. Just dip it in EMPIRE'S jewelry cleaner solution for 4 seconds and rinse. Repeat until it is the desired color again. However, don't darken and undarken in a short span of time, leave it for a few weeks and then take off the coloring.
Hope your enjoyed this tutorial! Would love your feedback.
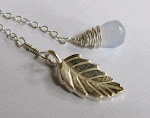
Also, You can now follow Artwark on twitter! it's http://www.twitter.com/artwark updates daily! Invite me to your twitter, and i will follow you too!! Special Twitter only offers this week on my bird necklaces: TWEET!
Right now I'm working on posting some new items called the 'Mini me WISH" collection and updating my Islamic line. Be sure to check back this friday to see some of those new items!!
xo
Sarah
p.s. feel free to leave comments and questions!!


2 comments:
Thats a good post! I too have used hard boiled eggs to oxidize, had great results too. I just mashed up the hot eggs (shells and all) with the silver inside a zip lock, closed it tight quickly and let it hang for a couple of hours. I stuck it inside my microwave (switched off, of course) so that it continues to stay warm. Later on I just washed off the egg bits under running water and with a bit of mild detergent.
putting it back in the microwave is a great idea!
Post a Comment